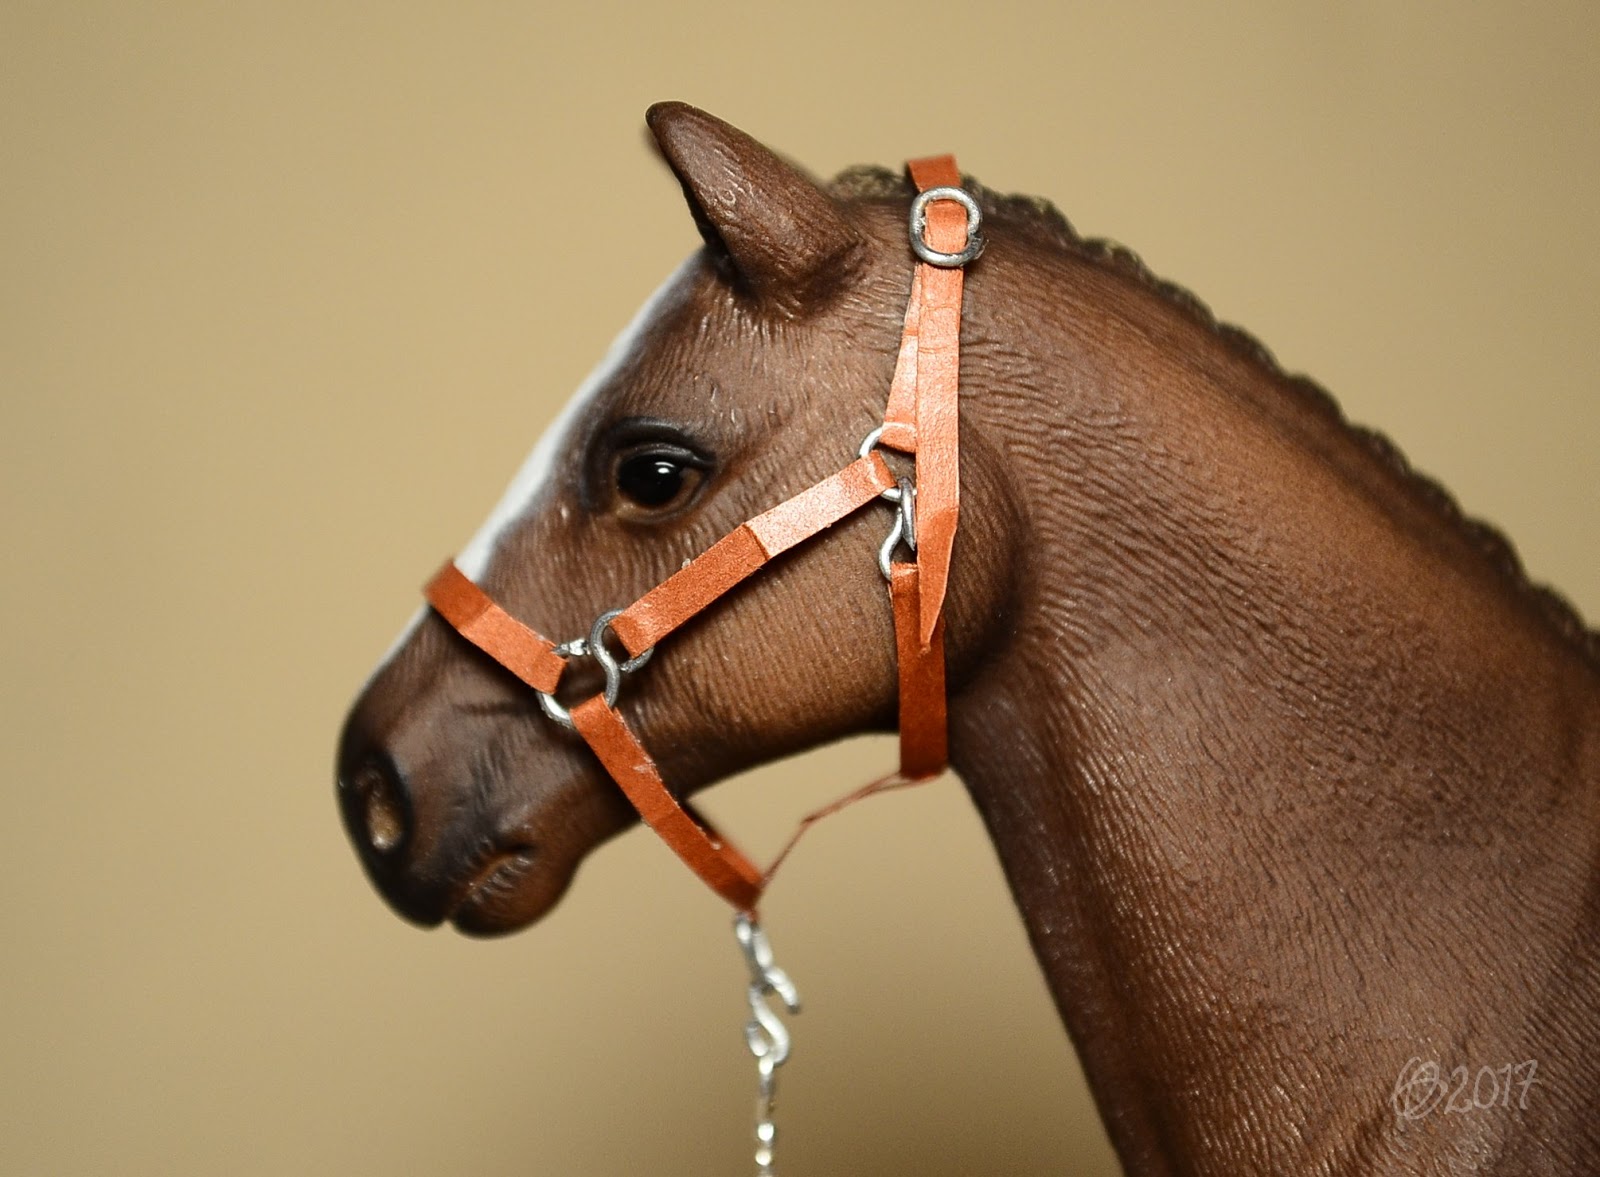
Thanks to internet, I once got an idea to try another of artist's best friend for tackmaking: paper. Shortly, I made halters for Schleichs and used paper as material.
First tries are never so good as they should. I colored white paper with a blue Copic marker, and then put painter's tape on it. Well, to keep it less weak... And that only because I have no clear tape here right now.
While I cut the taped paper piece to lace, I also colored another area of the paper and sealed it with varnish (only one side...)! That is what worked! I cutted that to lace too. The taped laces got sealed after I cutted them, not so easy thing...
Then I, of course, made halters. They were more OK than good, but I was going to make more and try different papers also.
Next I tried thicker, brown paper. I drew the lines to make it easier to cut, and sealed that from both sides with varnish, before I cutted the laces.
Well, it got four individual halters to see that it works. I now know that this is a good material, if you know what you do. Paper is not similar to leather, it is weaker and sharper, easier to cut but worse with fails. When used well and carefully, it seems to look perfect.
Here are the examples.
First blue halter, pony or small horse size. The noseband's upper part is slightly too long and loose, but better that instead of too narrow noseband. (Narrow nosebands are a big problem in model horse tack...) Could fit better without the 8 -shaped ring piece, but well, I often make those just to make a bit longer cheekpieces. Too much visible mistakes what I don't bother to fix as I fought with this halter so much already.
Second blue halter, with painter tape. Very wide straps, hmm... Not so good. But they are in better length, the halter is too inflexible to show how it really fits. Buckle is bad, blergh.
Third halter is brown. Buckle isn't nice (but it works), the 8 -rings aren't the best for Schleich halters, I see too. Unfortunately, this halter has flaws; folds in areas what aren't meand to look folded!
Fourth looks best and is practically a better version from previous one. This has no folds, no 8 -rings, and it has two hooks and a squared buckle! Well, I really needed to start enjoy of making small buckles with corners... Because it makes life so easy. I also made sure that THIS halter fits to my unfinished hannover mare CM, who is going to be a trotting finnhorse stallion. He has yarn mane (tested... found the idea of yarn from other blogs) who allows halters.
So, if anyone wonders what material to use for Schleich halters... Try paper. I personally find it useful, although leather really has things that make it at the end better material; you can punch holes to leather, not on paper, and adding thin straps to buckles is more safe in leather than paper.
I am making more paper halters at the future. In Schleich scale.
Näytetään tekstit, joissa on tunniste tackmaking. Näytä kaikki tekstit
tiistai 23. toukokuuta 2017
perjantai 30. joulukuuta 2016
Weird halter
I know I once made this, but I didn't photograph it until now. I simply forgot the whole tack piece... And yet less I remember how it should be used!
This is one of those moments when you know your invention is unbelievable, because you should have instructions of it's usage and fitting...
This thingy was a weird halter (or "halter") with chain noseband, tongue-buckled crownpiece, cheekpieces and... Weird rings. No throatlatch or anything else who could be normal parts of a halter, because this was meant to be used with pressure! Some kind of force halter.
I also had made a whole separate strap to attach bits, and also fitting bits belong to the set. I know I meant it originally that the bit strap can be attached to the halter to make them... to be some kind of multi-use halter/bridle, BUT of course I really don't remember how I set this first time.
Anyway, I photographed it now on the same horse who was the one I made the tack to fit.
I know that the chain is too long when set like in these second photos. I remember that something depended from the large ring, without it that setting could not have been possible... Well, I surely go to play with this a lot later, when I am OK with it, but right now I wanted to photograph how the thingy is meant to fit when it's simply set.
In those the chain goes from the front rings to the hind ones, having a place of throatlatch - and hooks meet there. So when you pull from the rope, it's throat what feels the biggest pressure; and scrag, too. Noseband just makes sure the whole thingy works, although I imagine the chain noseband to be yet worse force tool than just a strap to keep the halter in a halter's shape.
Then I added the bits, and bit strap; I don't bother to call it bridles nor crownpiece/cheekpiece -mix, because, well, it's just a strap with two buckles.
Rope and reins seen in the photos do not belong to the same set; reins I got from other bridles and the rope was made just for photographs like that, to be a good, easily used rope.
I think the set looks nicer this way, with more straps and messy metal parts. It just shows what horse poeple (some who claim they are horse lovers, although I think they're just sport lovers) are ready to do to make themselves feel skilled and safe while their horse just is tied, forced to be a sport machine.
Yet closeup of the bits. I always want to see how people make bits, and I am interested to see how they work, no matter how cruel the tool is. Knowing that just makes sure we know how to make them in mini scale.
For some reason, almost no one of my weirdest bits work as I planned them to do...Mostly it comes from too long curbchain or the fact that Remu (that horse) just has too short mouth.
I photographed what the bits look when reins are pulled, and while not.Not a surprise that the effect seen isn't really how it should be, but hey, plastic mouth doesn't allow it to look realistic.
I apologize the possible mess and confusion in my blogtexts, bad photos and weird English. I haven't been comfortable with my texts lately, but I try to get rid of that; if I never dare to publish anything, I never know how readable they are. And what comes to photos, I often take 'quick' photos and less often, when I want to focus properly to my photographing, I take the better camera and soften it's flash and so on. But that good job takes often too much brains, and I do it only when I feek good enough to.
So, mostly I try to apologize the horrific photos I throw here.
| Yea, trust that the little horse expert is strong enough to hold a huge thoroughbred. |
This is one of those moments when you know your invention is unbelievable, because you should have instructions of it's usage and fitting...
This thingy was a weird halter (or "halter") with chain noseband, tongue-buckled crownpiece, cheekpieces and... Weird rings. No throatlatch or anything else who could be normal parts of a halter, because this was meant to be used with pressure! Some kind of force halter.
I also had made a whole separate strap to attach bits, and also fitting bits belong to the set. I know I meant it originally that the bit strap can be attached to the halter to make them... to be some kind of multi-use halter/bridle, BUT of course I really don't remember how I set this first time.
Anyway, I photographed it now on the same horse who was the one I made the tack to fit.
I know that the chain is too long when set like in these second photos. I remember that something depended from the large ring, without it that setting could not have been possible... Well, I surely go to play with this a lot later, when I am OK with it, but right now I wanted to photograph how the thingy is meant to fit when it's simply set.
In those the chain goes from the front rings to the hind ones, having a place of throatlatch - and hooks meet there. So when you pull from the rope, it's throat what feels the biggest pressure; and scrag, too. Noseband just makes sure the whole thingy works, although I imagine the chain noseband to be yet worse force tool than just a strap to keep the halter in a halter's shape.
Then I added the bits, and bit strap; I don't bother to call it bridles nor crownpiece/cheekpiece -mix, because, well, it's just a strap with two buckles.
Rope and reins seen in the photos do not belong to the same set; reins I got from other bridles and the rope was made just for photographs like that, to be a good, easily used rope.
I think the set looks nicer this way, with more straps and messy metal parts. It just shows what horse poeple (some who claim they are horse lovers, although I think they're just sport lovers) are ready to do to make themselves feel skilled and safe while their horse just is tied, forced to be a sport machine.
| Todays I don't feel that I am a photographer, just look at these damn bad pics... |
Yet closeup of the bits. I always want to see how people make bits, and I am interested to see how they work, no matter how cruel the tool is. Knowing that just makes sure we know how to make them in mini scale.
For some reason, almost no one of my weirdest bits work as I planned them to do...Mostly it comes from too long curbchain or the fact that Remu (that horse) just has too short mouth.
| Really, never photograph anything small this way... Never. |
| I always take these "show" photos of my horses when I try to photograph their tack. |
I photographed what the bits look when reins are pulled, and while not.Not a surprise that the effect seen isn't really how it should be, but hey, plastic mouth doesn't allow it to look realistic.
| My newer doll (one of them) shows an arm there! |
I apologize the possible mess and confusion in my blogtexts, bad photos and weird English. I haven't been comfortable with my texts lately, but I try to get rid of that; if I never dare to publish anything, I never know how readable they are. And what comes to photos, I often take 'quick' photos and less often, when I want to focus properly to my photographing, I take the better camera and soften it's flash and so on. But that good job takes often too much brains, and I do it only when I feek good enough to.
So, mostly I try to apologize the horrific photos I throw here.
Tunnisteet/tags:
bridles,
halters,
tackmaking,
traditional,
weird things
tiistai 8. marraskuuta 2016
"I didn't get any help for this!"
An idea for a blogtext came from a random mumble... The theme is helping other hobbyists with tackmaking problems.
When we see someone's homemade model horse tack, we of course often ask how it's made. Many people like sharing their knowledge, but some others tell that they do not explain it. Why? "Because I didn't get any help neither." they answer.
So they refuse from helping others with problems because no one helped them, they got forced to practice and solve all problems alone. They can feel like winners in that, and it's true because learning a new trick is winning.
But really, why the toe we should just continue to roll the squirrel wheel as we could simply stop it and help others, so they can't get the same situation?
Someones also refuse from helping because they do not want their techniques or styles to get copied or stolen. That is quite understandable, as an artist I can feel that and know why. But still, this is not a reason to refuse from helping others neither.
The key is just to understand that anyone can't really steal or copy your way to do things. better we could recommend to do things in some way, practice and especially recommend to learn what the 1:1 thing is, how it is used and made, how we can make a mini version from it. And honestly, all well made English style horse tack IS really similar to each other, so what the toe is the problem with "copying"? Because in fact, when you make a mini version of a 1:1 bridle, you copy the style of the maker of that bridle too! And no one is punishing from that. Weird?
Yes?
No?
I can honestly tell that I like when anyone asks me how to do things in miniatures. Mostly the questions have been about customizing, and that's also a reason why I really made a tutorial to my main blog (in Finnish). If I didn't want anyone to 'steal my way to do things', I could never publish it. Now I also just wait the moment when it is publishable, qualitied enough for starter custom modellers.
Because, if I do things rightly and see mistakes by others, I so much want to fix the mistakes. That can't be possible if I don't help the another hobbyist. And what kind of craft hobby it is where others do not share their ways to do things? For me the checking other's tutorials and tips is one salt in model horse hobby! Without help from others I couldn't be on this level I am now.
Only nice photos of great mini tack is not enough for me. I see them easily from everywhere around internet. But, thanks to the sharing hobbyists, I even read some blogs.
And I hope that my blogs could be interesting via similar effect too.
When we see someone's homemade model horse tack, we of course often ask how it's made. Many people like sharing their knowledge, but some others tell that they do not explain it. Why? "Because I didn't get any help neither." they answer.
So they refuse from helping others with problems because no one helped them, they got forced to practice and solve all problems alone. They can feel like winners in that, and it's true because learning a new trick is winning.
| For long time I made sliding buckles from staples, until I bought metal wire. |
But really, why the toe we should just continue to roll the squirrel wheel as we could simply stop it and help others, so they can't get the same situation?
Someones also refuse from helping because they do not want their techniques or styles to get copied or stolen. That is quite understandable, as an artist I can feel that and know why. But still, this is not a reason to refuse from helping others neither.
The key is just to understand that anyone can't really steal or copy your way to do things. better we could recommend to do things in some way, practice and especially recommend to learn what the 1:1 thing is, how it is used and made, how we can make a mini version from it. And honestly, all well made English style horse tack IS really similar to each other, so what the toe is the problem with "copying"? Because in fact, when you make a mini version of a 1:1 bridle, you copy the style of the maker of that bridle too! And no one is punishing from that. Weird?
Yes?
No?
I can honestly tell that I like when anyone asks me how to do things in miniatures. Mostly the questions have been about customizing, and that's also a reason why I really made a tutorial to my main blog (in Finnish). If I didn't want anyone to 'steal my way to do things', I could never publish it. Now I also just wait the moment when it is publishable, qualitied enough for starter custom modellers.
Because, if I do things rightly and see mistakes by others, I so much want to fix the mistakes. That can't be possible if I don't help the another hobbyist. And what kind of craft hobby it is where others do not share their ways to do things? For me the checking other's tutorials and tips is one salt in model horse hobby! Without help from others I couldn't be on this level I am now.
| I use (make) hooks instead of buckles for many bridle parts. Makes living easier, no matter is it how believable. (I have retouched the bridles already because the overlong straps disturbed me.) |
Only nice photos of great mini tack is not enough for me. I see them easily from everywhere around internet. But, thanks to the sharing hobbyists, I even read some blogs.
And I hope that my blogs could be interesting via similar effect too.
Tunnisteet/tags:
helping,
pondering,
tackmaking
Tilaa:
Blogitekstit (Atom)